Final Piece
"Kettle Face"
Original storyboard

For my final piece I decided to use the 'traditional method' of animation, drawing everything from hand was something I was comferatable doing.
I made a few preliminary sketches around the edges of my storyboard just so I could get the feel for the character that I was going to draw, the storyboard itself looks relatively simple this is because characters body will always be in shot. I knew I wanted the actions of my animation to be easily perceived by the viewer, I thought the best way to do this would be to have a centralised composition.
The subject's that will be animated will be; characters arms & wrists, facial expressions, tea cup moving, exaggeration of nose growth (into spout), tea pouring from nose (spout), according to my storyboard.
Cartoon Network 'Adventure Time' Story Board
I used the same process as above
Character Design

After creating a storyboard I then drafted out a design for my character, this was the crucial stage of the whole animation. Certain shapes have to be scaled out with consideration as they could be subjected to being animated, for instance if you look at the nose of my character (top left is the shape I used). I have used that shape in-particular because when the nose is being transformed into a 'tea spout' in later frames, the transition would look a lot more natural once it had been made into a GIF.
I knew this because I had priliminarly sketched a few forms of the transition beforehand.
Jim Jinkin's "Doug" - Nickelodeon
Character: Roger M. Klotz
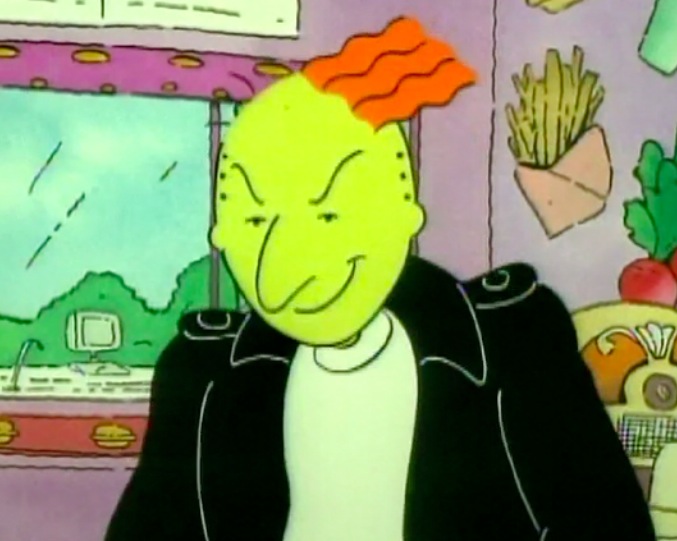

The house style I used is closely linked to Jim Jinkin's style of animation, I used his character design of the local bully that featured in the animations of 'Doug'.
I needed inspiration to help me pick what sort of nose style would fit the animation of the nose being turned into a tea pot spout, I liked the way the nose is long and arrogant and it also could be smoothly transformed into what I wanted it to be.
I also appreciated the characters style of clothing, this is also something I implicated onto my own drawings. They suited the body language that my character was going to be showing in later frames (angry).
Jim Jinkins on Character Design
I like the way Jim has came up with the inspiration of characters for his animation of 'Doug', he has used his own life as reference. Which is something I also like incorporating in my own drawings, for instance there is a reason for the tea to be pouring out of my characters nose. I got the idea from being at work, a customer was being very angry towards me over something that really wasn't a big deal. And all I could think of was, "this guy is going to have steam coming from his ears in a minute". So thats where my animation was really born, I felt that the only good use for being angry like that would be to boil a kettle from all the steam your giving off and have a brew!
Rough narrative of what was going to happen between frames

The only thing I did not include was the 'takes sip of tea', as I feel the main purpose of this animation was to represent the anger within someone.
As a rule I used 2 frames of the same image for everything, unless I wanted something to be animated for a bit longer in which case I used 4 frame for that same image.
(for the steam coming out the ears I used roughly 8 frames altogether, this was something I ammended after the animation was created).
Home made animation drawing board
To make my own light-box for 2D animation I used: Picture frame, glass, tracing paper (diffuser),r
ruler with steel loops (peg board), hole puncher, blue-tac, shoe box to prompt the frame at an angle, and a desk lamp.
You can see in the last image how effective this was, I could use this technique for 'onion skinning'.


The video above shows the process of making 'kettle face', I used the traditional way to create it by drawing everything by hand on paper. At this moment of time I knew that the background was going to be kept as standard (plain white paper), this is something that can be added later.
Scanned images - before editing digitally

This is my first draft of the animation you can still see pencil etchings, also its still in A4 format.
A traditional GIF uses 600 pixels as its width, I will crop my images once I am happy with the frames.
What didn't go to plan
 |
| To make my life easier when I was drawing this, I used a few compulsery shortcuts. For instance I wanted to create the action of the steam purging from the character's head, to do this I used frame #12 & #13 and repeated - Frame: 11 - (12-13-12-13) -14 I did not notice that this sequence would interfeir with the final motion at the time, the nose was transforming to its new form but then transforms back to its original form for one frame. This made the nose look like it was 'jumping', it didn't look right. To fix this I used photoshop and created a new layer/frame to resurrect the motion, I used the pencil tool to extend the nose and 'fill' to mask any redundant lines. |
 |
| New frame/layer created using Photoshop (Inbetweening) |
 |
| New mouth layer created using Photoshop |
 |
| Frame #18(x4) was static images before being scanned, to animate the tea pouring I changed two of the frames/layers out of the four. And placed them back in the timeline in the right order. frame: 17 - (18 - 18new - 18 - 18new) - 19 Doing this made the pouring action of the tea more realistic compared to a still |


⬆️Uploading & Saving

Using Photoshop as a platform to animate my images really sped things up, I didn't have too rely on 'online gif makers' to create it for me.
To upload images to be made into a gif format, first you must upload images files into stack. Which basically prepares all your layers/frames for you, ready to be created into an animation.
Its important to know Photoshop's 'workspace' tabs, working on essentials (default) will allow you to adjust the layers and edit things like tone and colour. To work on the animation (moving image) you must select the 'motion' tab, which will then bring up a timeline with all the frames.
I used 'essentials' to edit my background colour, I used a gradient with beige tone to represent the beverages tone. Also bumped up the brightness and contrast, I could change all my layers at once by grouping them.
Second draft

Here is my second draft I thought it was completed until I watched it over and over on a 'loop', I noticed that the actions of the steam & pouring was not being shown for long enough to get a great emphasis on what is happening.
To fix this I duplicated the layers/images that has the steam and 'tea pouring' to make them run for longer, also I could adjust the 'delay time' using Photoshop's 'timeline'.
Final Piece

Assets: 'Traditional animation', paper, pencil & pen, light box, trace, 'onion skinning', photoshop, scanned image, monochrome, 2D


